UEController

分析现有的第一人称射击游戏可以发现,无论是早期的CS,Half-Life还是最近的使命召唤,战地.基本的操作模式几乎一样.玩家角色的面向永远跟随鼠标/控制器的旋转,移动基于视角的面向进行.

泰坦陨落

而第三人称游戏的操作模式有些变化,大体上可以分为两种模式.

一种为角色朝向输入方向运动,大部分自由视角的游戏都是这种操作模式.

一种为角色朝向相机的八方向运动,锁定敌人的情况下会是这种操作模式(艾尔登法环,黑暗之魂的锁定系统).

而无论角色朝向相机与否,角色的移动总是基于相机方向进行.

在大多数游戏需要的移动控制需求都十分类似的情况下,非常适合在引擎中实现一套功能完善的控制系统,避免游戏开发者重复造轮子.Unreal在其GamePlay框架下实现了一套大部分情况下能满足开发者需求的控制系统.

PlayerController

首先可以看官方文档对PlayerController的解释:

PlayerController(玩家控制器) 是Pawn和控制它的人类玩家间的接口。PlayerController本质上代表了人类玩家的意愿。当您设置PlayerController时,您需要考虑的一个事情就是您想在PlayerController中包含哪些功能及内容。您可以在 Pawn 中处理所有输入, 尤其是不太复杂的情况下。但是,如果您的需求非常复杂,比如在一个游戏客户端上的多玩家、或实时地动态修改角色的功能,那么最好在PlayerController中处理输入。在这种情况中,PlayerController决定要干什么,然后将命令(比如”开始蹲伏”、”跳跃”)发布给Pawn。

与PlayerController相对的是AIController,两者都继承自Controller.
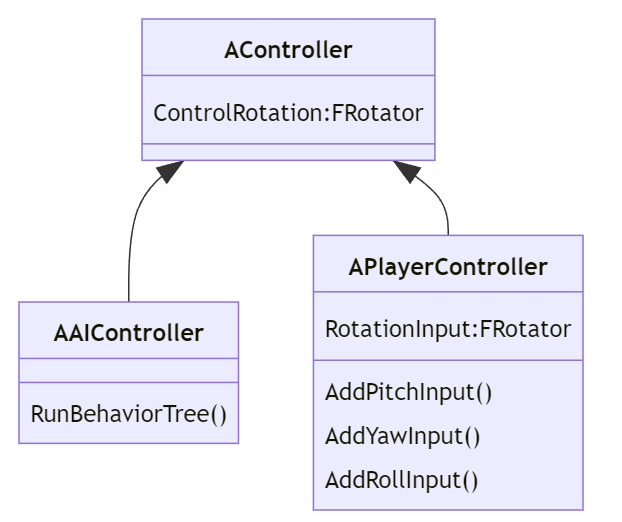
1
2
3
4
5
6
7
8
9
10
11
12
13
14
15
16
17
18
19
classDiagram
class AController{
ControlRotation:FRotator
}

class AAIController{
RunBehaviorTree()
}

class APlayerController{
RotationInput:FRotator
AddPitchInput()
AddYawInput()
AddRollInput()
}

AController <|--AAIController
AController <|--APlayerController

AIController提供行为树管理AI控制的Pawn,PlayerController则接受输入控制玩家角色Pawn.

PlayerContoller中成员方法众多,这里我们只关注ControlRotaion这个属性.

ActorRotation与ControlRotation

ActorRotaion容易理解,无论是在第一人称还是第三人称的游戏中,玩家的角色总是会有一个面向,这个面向在Unreal中被称为ActorRotaion.

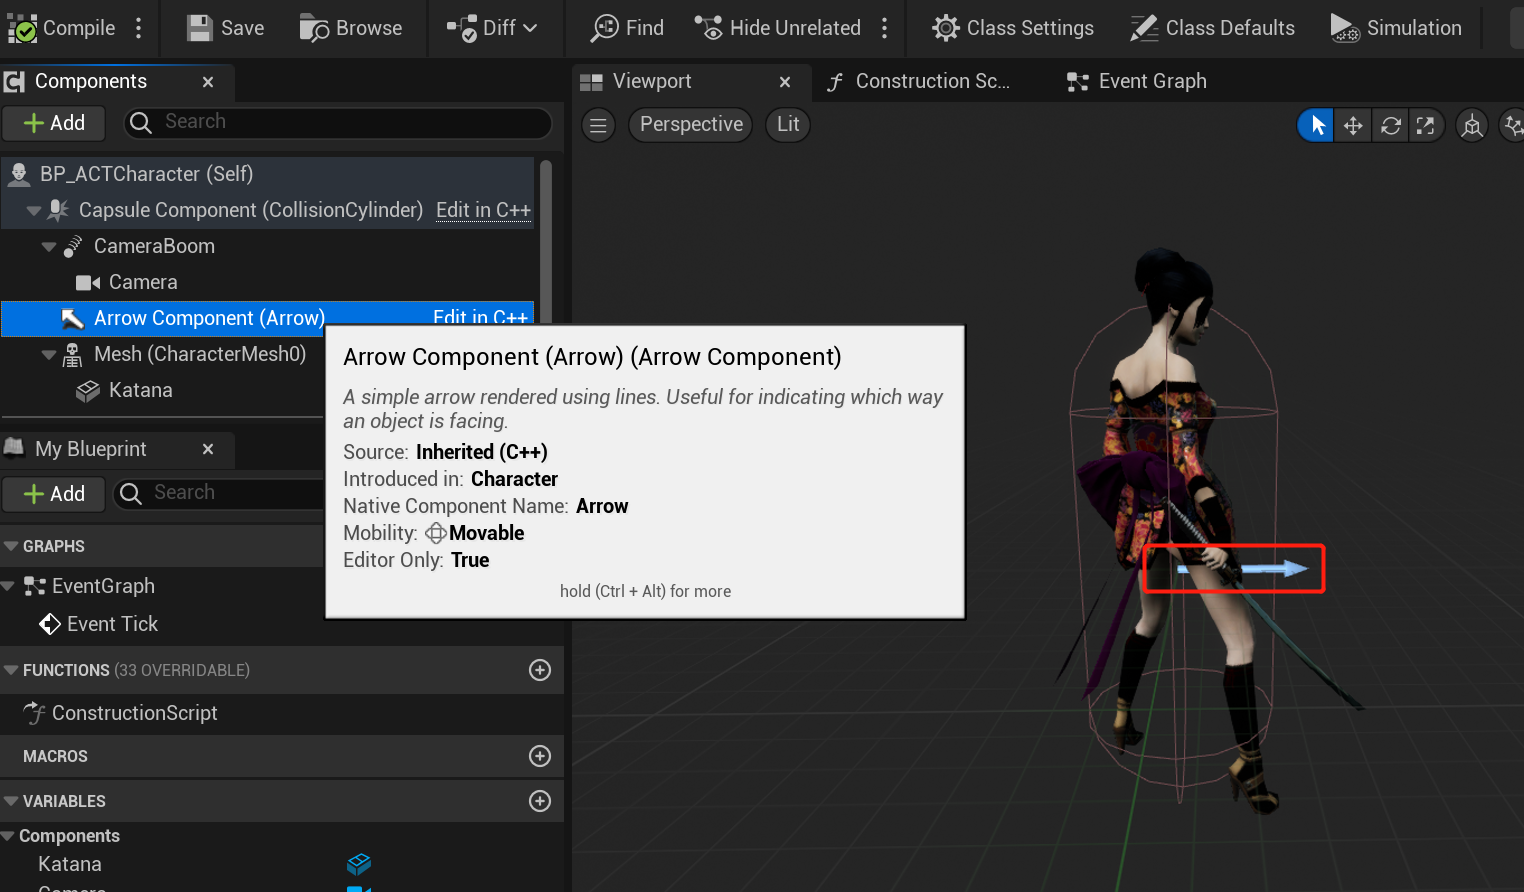
图中箭头指向的方向可以用来标记这个朝向.

ControlRotation的含义是什么呢?实际上就是视角的面向,在第三人称无锁定自由视角的操作模式下,角色的面向与视角的面向在大部分时候并不一致,玩家可以自由控制视角的面向,只需要转动视角既能让角色正对着屏幕,也能让角色背对屏幕.这个过程实际上就是改变了ControlRotation,并且让相机POV根据新的ControlRotation进行位置和旋转面向的调整:


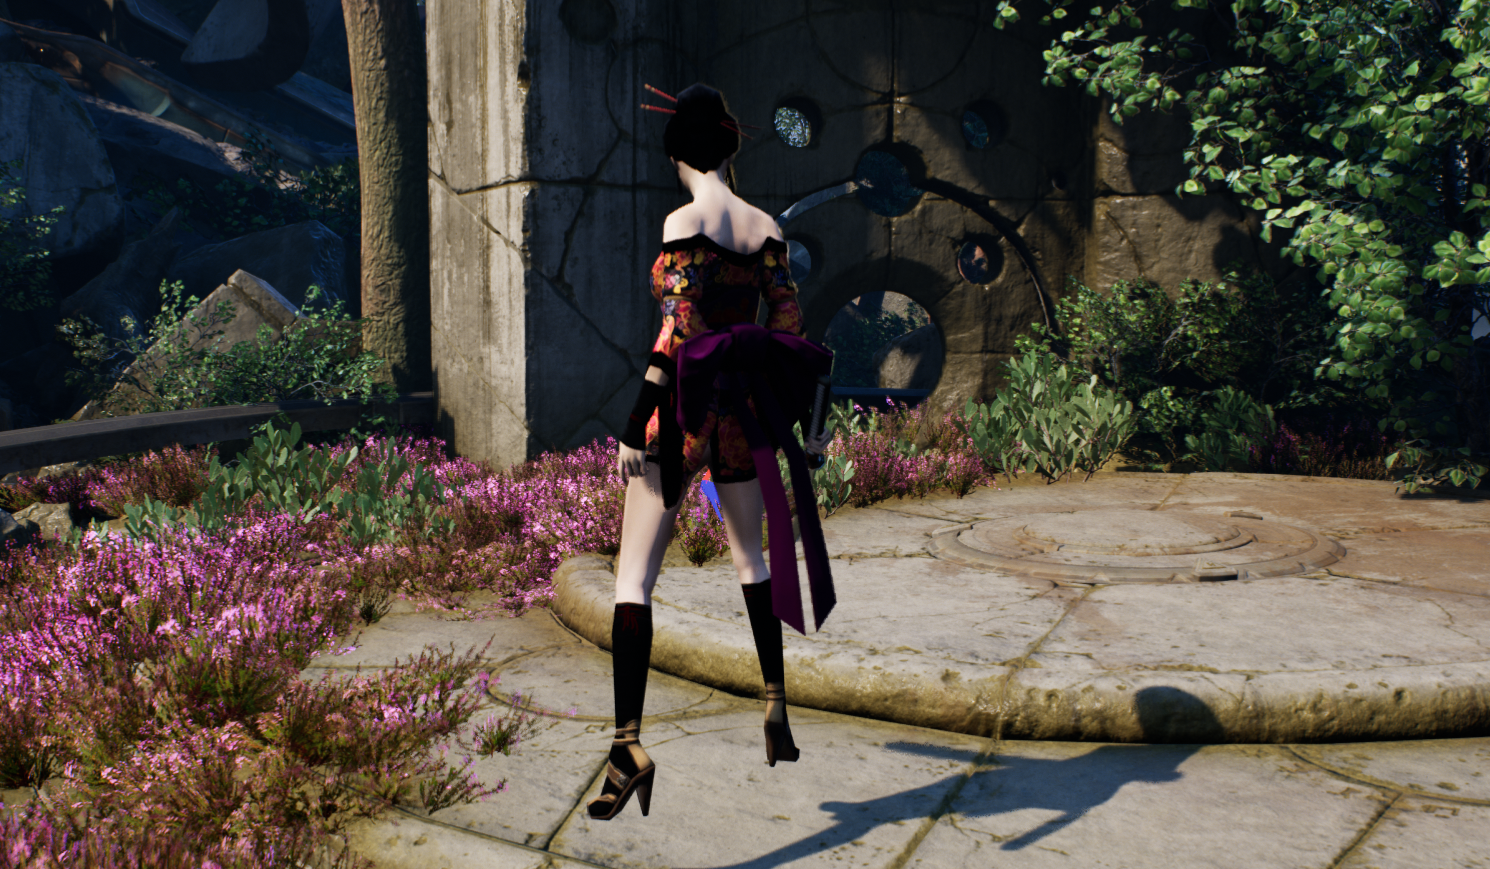
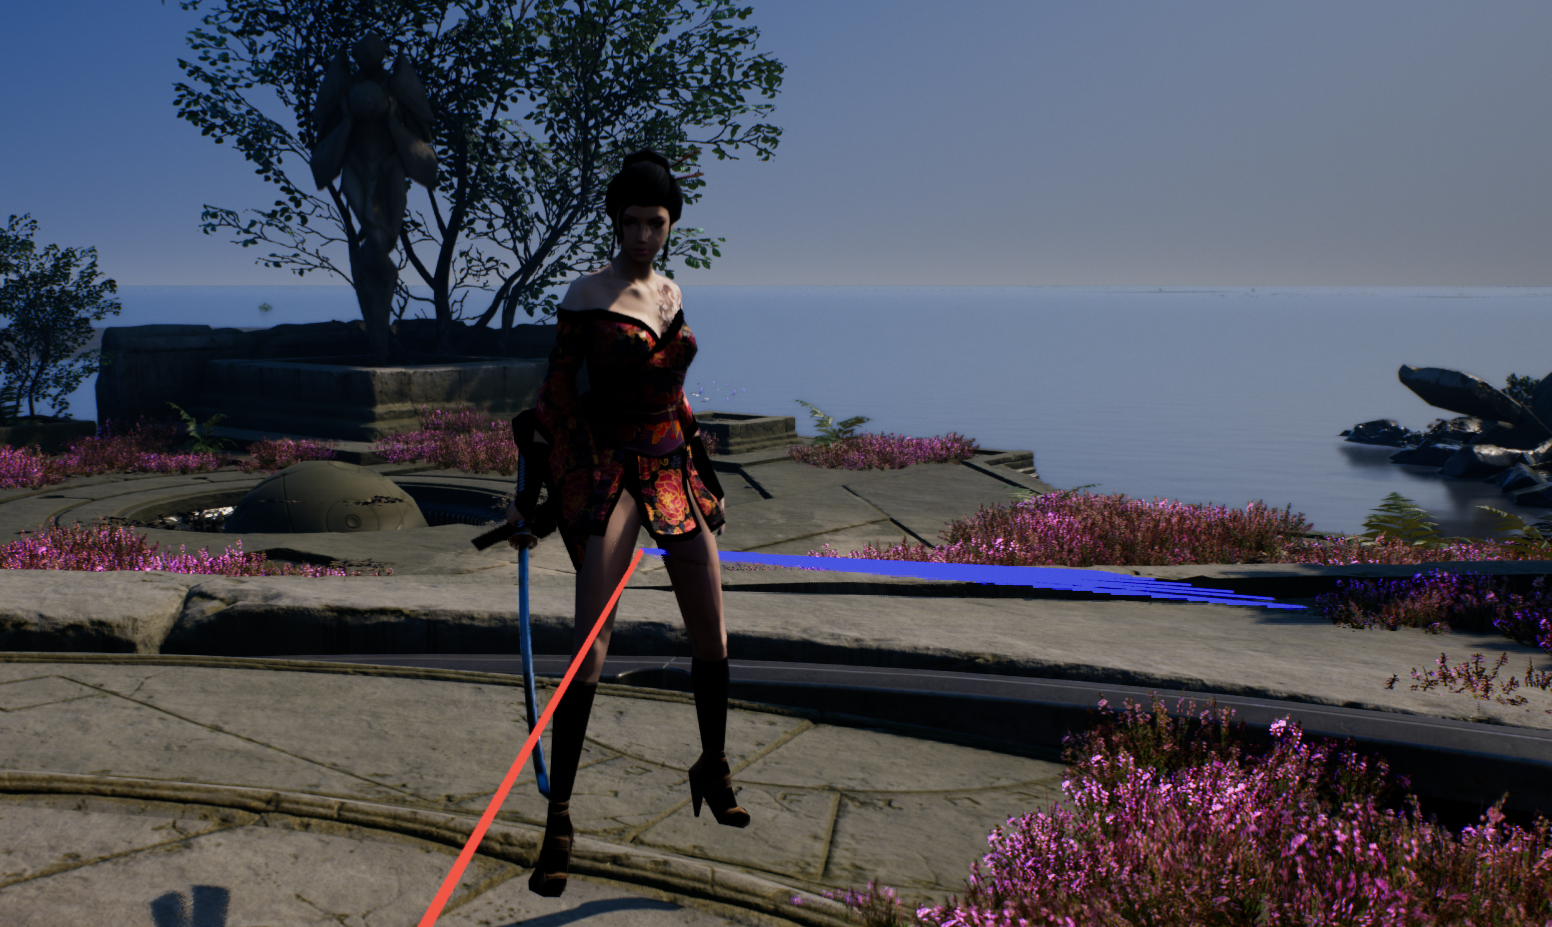
图中的红线方向是角色的面向,蓝线则是转动视角时视角的面向,实现的逻辑如下:
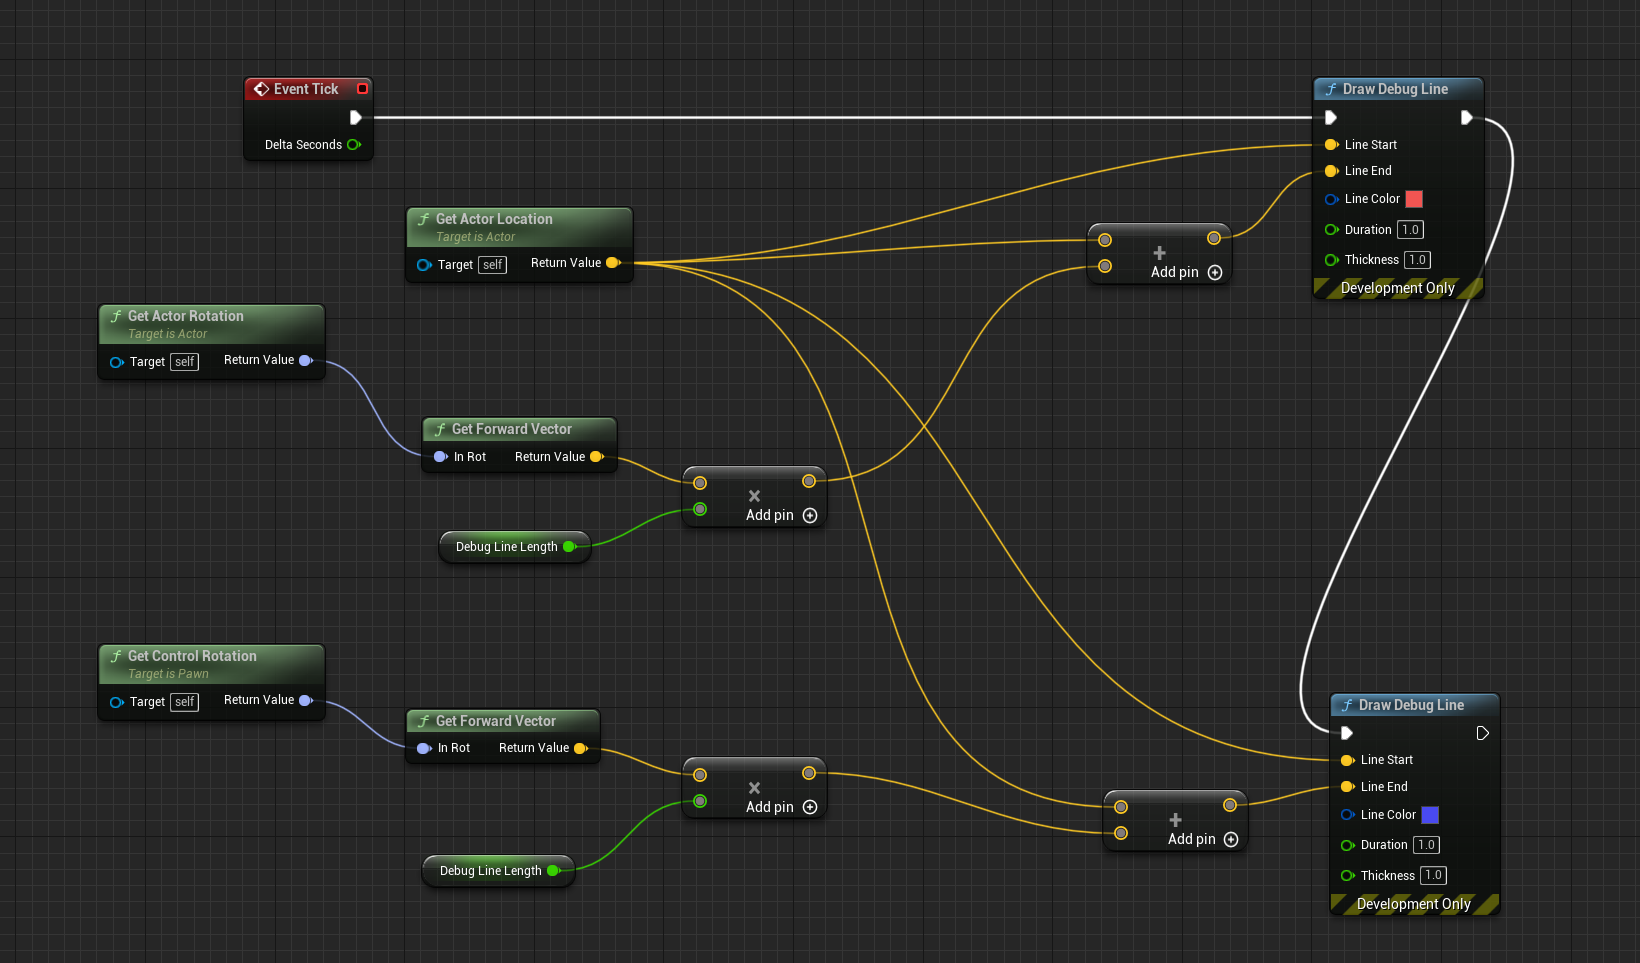
ControlRotation更新逻辑

ControlRotation接受玩家输入的接口是

  • APlayerController::AddPitchInput(float val)
  • APlayerController::AddYawInput(float val)
  • APlayerController::AddRollInput(float val)

一般来说只需要考虑Pitch和Yaw的输入,用鼠标作为输入为例,Pitch对应上下瞄准,Yaw对应左右瞄准,同理可以推及手柄(右摇杆上下左右移动)/手机屏幕(上下左右划屏幕).

在ACharacter::SetupPlayerInputComponent的执行过程中可以对输入设备的输入进行回调函数绑定.

1
2
3
4
5
6
7
8
9
10
11
12
13

void AACTCharacter::SetupPlayerInputComponent(UInputComponent* PlayerInputComponent)
{
Super::SetupPlayerInputComponent(PlayerInputComponent);
...
PlayerInputComponent->BindAxis(TEXT("Turn"), this, &ACharacter::AddControllerYawInput);
PlayerInputComponent->BindAxis(TEXT("LookUp"), this, &ACharacter::AddControllerPitchInput);
}

void APlayerController::AddYawInput(float Val)
{
RotationInput.Yaw += !IsLookInputIgnored() ? Val : 0;
}

接受到输入后ControlRotation并不会立刻更新,而是等待PlayerController的Tick调用,结束后会将RotationInput中累积的数据清空.

1
2
3
4
5
6
7
8
9
10
11
12
13
14
15
void APlayerController::UpdateRotation( float DeltaTime )
{
// Calculate Delta to be applied on ViewRotation
FRotator DeltaRot(RotationInput);

FRotator ViewRotation = GetControlRotation();

if (PlayerCameraManager)
{
PlayerCameraManager->ProcessViewRotation(DeltaTime, ViewRotation, DeltaRot);
}
...
SetControlRotation(ViewRotation);
...
}

Update Camera By ControlRotation

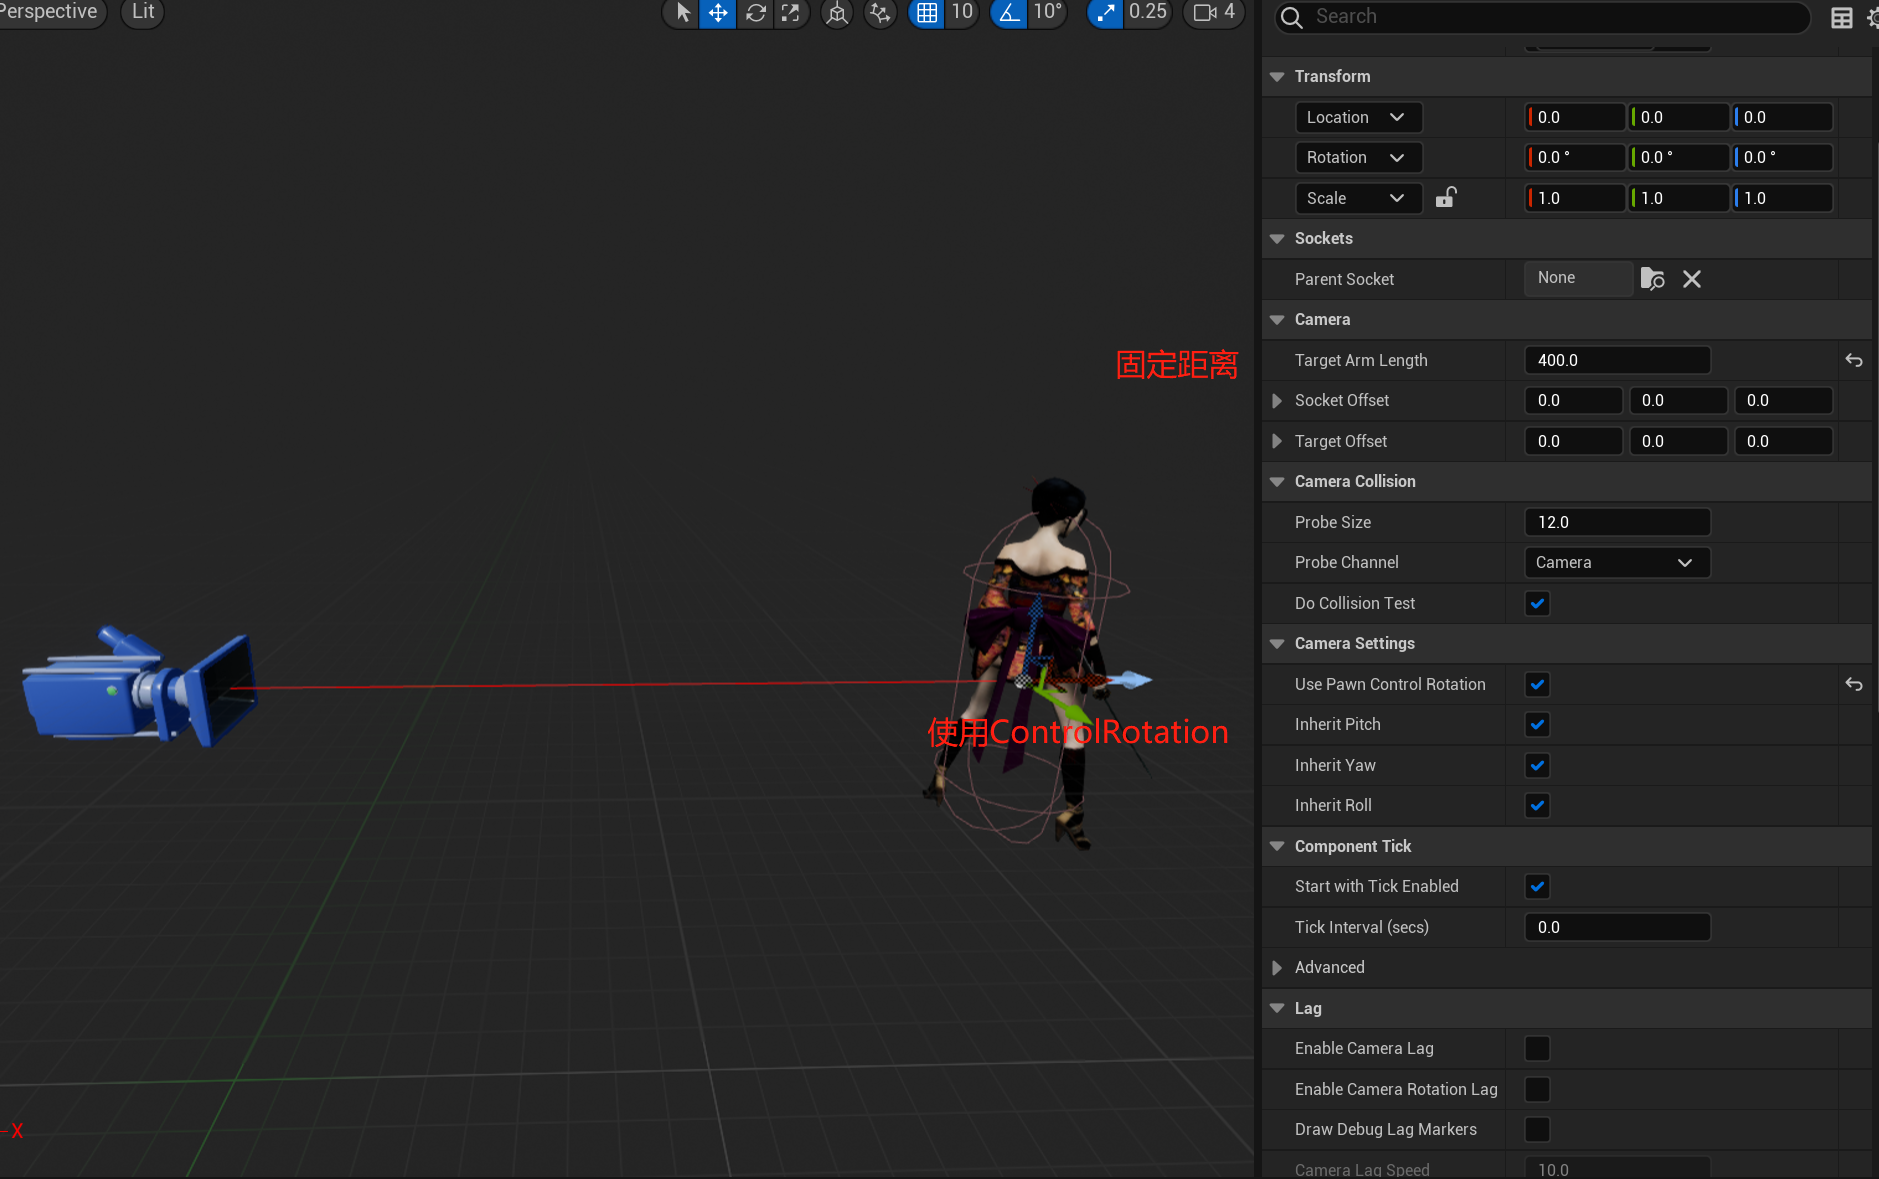
在分析相机的文章中有提到过SpringArmComponent,在其Camera Settings的栏位中有UsePawnControlRotation,Inherit Pitch,Inherit Yaw,Inherit Roll四个属性,勾选这些选项后,子节点的相机就能根据鼠标的转动调整位置和朝向,为PlayerCameraManager提供合适的POV.

这些选项体现在代码中就是

1
2
3
4
5
6
7
8
9
10
11
12
13
14
15
16
17
18
19
20
21
22
23
24
25
26
27
28
29
30
31
32
33
FRotator USpringArmComponent::GetTargetRotation() const
{
FRotator DesiredRot = GetDesiredRotation();
if (bUsePawnControlRotation)
DesiredRot = PawnViewRotation;
const FRotator LocalRelativeRotation = GetRelativeRotation();
if (!bInheritPitch)
DesiredRot.Pitch = LocalRelativeRotation.Pitch;
if (!bInheritYaw)
DesiredRot.Yaw = LocalRelativeRotation.Yaw;
if (!bInheritRoll)
DesiredRot.Roll = LocalRelativeRotation.Roll;
return DesiredRot;
}

void USpringArmComponent::UpdateDesiredArmLocation(bool bDoTrace, bool bDoLocationLag, bool bDoRotationLag, float DeltaTime)
{
FRotator DesiredRot = GetTargetRotation();
...
// Now offset camera position back along our rotation
DesiredLoc -= DesiredRot.Vector() * TargetArmLength;
// Add socket offset in local space
DesiredLoc += FRotationMatrix(DesiredRot).TransformVector(SocketOffset);
FVector ResultLoc = DesiredLoc;
/ Form a transform for new world transform for camera
FTransform WorldCamTM(DesiredRot, ResultLoc);
// Convert to relative to component
FTransform RelCamTM = WorldCamTM.GetRelativeTransform(GetComponentTransform());
// Update socket location/rotation
RelativeSocketLocation = RelCamTM.GetLocation();
RelativeSocketRotation = RelCamTM.GetRotation();
UpdateChildTransforms();
}

总结代码的逻辑就是

相机的位置 = 父节点位置 - ControlRotation * 弹簧臂长

相机旋转 = ControlRotation

经过弹簧臂的逻辑更新后,相机的朝向永远正对视角的朝向,位置则是保持在以角色为球心,弹簧臂长为半径的球面上,这样也就实现了第三人称下自由视角模式的摄像机功能.

锁定模式下的人物朝向相机运动逻辑也容易理解,ControlRotation不再接受输入,ControlRotation与ActorRotation都固定为人物与锁定目标的连线.

CharacterMovement By ControlRotation

前面提到过,人物的移动无论是在哪种操作模式下(包括第一人称),前进方向永远是相机的朝向,所以移动的逻辑也十分通用.

1
2
3
4
5
6
7
8
void AACTCharacter::MoveForward(float val)
{
if ( val == 0.0f || !CanMove)
return;
const FRotator Rotation = GetControlRotation();
const FRotator YawRotation(0, Rotation.Yaw, 0);
AddMovementInput(YawRotation.Vector(), val);
}

AddmovementInput是引擎中提供的接口,每次AddMovementInput,经过多层跳转最终都会回到Pawn::Internal_AddMovementInput,累加输入的方向.

1
2
3
4
5
6
7
void APawn::Internal_AddMovementInput(FVector WorldAccel, bool bForce /*=false*/)
{
if (bForce || !IsMoveInputIgnored())
{
ControlInputVector += WorldAccel;
}
}

每次UCharacterMovementComponent::TickComponent时,都会消耗掉当前帧累加的ControlInputVector(是不是很像生产者消费者模型?):

1
2
3
4
5
6
7
8
9
10
11
12
13
14
15
16
17
18
19
20
UCharacterMovementComponent::TickComponent(...)
{
...
InputVector = ConsumeInputVector();
...
//Client Owner端和Server端进行实际的移动操作
if (CharacterOwner->GetLocalRole() > ROLE_SimulatedProxy)
{
//Client Owner根据InputVector进行移动
if (CharacterOwner->IsLocallyControlled()||...)
{
ControlledCharacterMove(InputVector, DeltaTime);
}
}
else if (CharacterOwner->GetLocalRole() == ROLE_SimulatedProxy)
{
...
SimulatedTick(DeltaTime);
}
}

UCharacterMovementComponent::ControlledCharacterMove会将InputVector映射到[0,MaxAcceleration]之间,用这个加速度本地预表现后再发送给Server端进行校验(PerformMovement是实际修改位置的逻辑):

1
2
3
4
5
6
7
8
9
10
11
12
13
14
15
16
17
18
19
20
FVector UCharacterMovementComponent::ScaleInputAcceleration(const FVector& InputAcceleration) const
{
return GetMaxAcceleration() * InputAcceleration.GetClampedToMaxSize(1.0f);
}

void UCharacterMovementComponent::ControlledCharacterMove(const FVector& InputVector, float DeltaSeconds)
{
...
Acceleration = ScaleInputAcceleration(ConstrainInputAcceleration(InputVector));
if (CharacterOwner->GetLocalRole() == ROLE_Authority)
{
//权威端直接PerformMovement,这是实际修改位置的逻辑
PerformMovement(DeltaSeconds);
}
else if (CharacterOwner->GetLocalRole() == ROLE_AutonomousProxy && IsNetMode(NM_Client))
{
//否则预表现移动并保存本次Move(用于后续拉扯后前滚到最新帧),再发送给Server校验
ReplicateMoveToServer(DeltaSeconds, Acceleration);
}
}

UCharacterMovementComponent::ReplicateMoveToServer写得实在太长,只能写个大概的理解了(忽略了为了节约带宽而写的逻辑…有点太复杂了):

1
2
3
4
5
6
7
8
9
10
11
12
13
14
15
UCharacterMovementComponent::ReplicateMoveToServer(float DeltaTime, const FVector& NewAcceleration)
{
//保存本次Move part1
FSavedMovePtr NewMovePtr = ClientData->CreateSavedMove();
NewMove->SetMoveFor(CharacterOwner, DeltaTime, NewAcceleration, *ClientData);
...
//Local预表现Move
Acceleration = NewMove->Acceleration.GetClampedToMaxSize(GetMaxAcceleration());
PerformMovement(NewMove->DeltaTime);
...
//保存本次Move part2
ClientData->SavedMoves.Push(NewMovePtr);
//发包让Server PerformMovement
CallServerMove(NewMove, OldMove.Get());
}

UCharacterMovementComponent::CallServerMove会RPC调用Server的代码,忽略掉其他逻辑,最终也会在Server端用本次Move的加速度PerformMovement:
CallServerMove->ServerMoveDual->(Client Call Server RPC)ServerMoveDual_Implementation->MoveAutonomous

1
2
3
4
5
6
7
8
void UCharacterMovementComponent::MoveAutonomous(...)
{
...
Acceleration = ConstrainInputAcceleration(NewAccel);
Acceleration = Acceleration.GetClampedToMaxSize(GetMaxAcceleration());
PerformMovement(DeltaTime);
...
}

这也就是在联网模式下,一次输入所需要执行的逻辑.